
It is common practice to use code names for projects under development. Often, companies devise a systematic approach to assign these code names. I can describe it as 1) picking a category (animal, lake, mountain, etc.), 2) picking more or less randomly one of them, et voilà, you have your code name.


You could not be more wrong if you think this is specific to the Tech. For example, if you have ever bought IKEA pieces of furniture, you may have wondered where these odd-sounding names come from – odd for someone not speaking Swedish, that is. Well, IKEA uses the same method. Each type of furniture is assigned a category: island, river, town, etc., and they pick one!


For today’s post title, I chose Nåttarö, a cute island in the Stockholm archipelago 😊. I did so because the unique product I am writing about is a computer. I had this twisted idea because the assembly guidelines of the DevTerm by Clockwork reminded me of a DIY furniture assembly guide. I want to reassure you that building this computer with a definitive retro look & feel was a delight. Not like with some shelve kits where you can end the build with a bag of extra pieces while missing a few other ones.


I fell for the DevTerm at first sight. It immediately reminded me of the TRS-80 Model 100 – and, alike –, a fantastic field laptop computer I wrote about several times in my blog (here or here). Truly an excellent and successful design, with 40+ years old machines that are still in use today.


So, when I spotted the DevTerm, I had to have one. Unfortunately, as often these days, it took a while before I received my DevTerm A06 kit (here). I picked the A06 model (ARM64-bit Dual-core Cortex-A72 + Quad-core Cortex-A53, Mali-T864, 4GB LPDDR4). But you can choose the more traditional – and compatible – CM3 (using a Compute Module 3+). Or, you can even go for the R-01 and its RISC processor (RISC-V 64bit Single-core RV64IMAFDCVU @ 1.0GHz, No GPU, 1GB DDR3). The good news is, since the DevTerm is a kit and de facto modular, you can swap and upgrade as you need (or want). In my case, I will wait for the hypothetical x86 compute node and upgrade to a Compute Module 4 in the meantime.
By the way, I pre-ordered the uConsole (here), as it pushes the concept one step further. And I bet this could be the ultimate pocket computer!


The DevTerm builds on top of the ARM/Linux ecosystem, with plenty of options and variations. Nothing revolutionary here, but nothing disappointing either. Business as usual. If like me, you want to code, then the sky is the limit! For instance, although nothing prevents me from installing and booting into Virtual T 😉 (here), I will likely opt for Microsoft’s Visual Code (install instructions here).
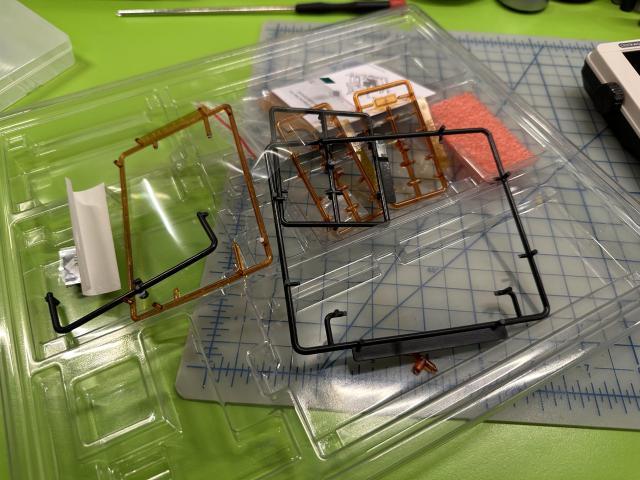
The build of the DevTerm is straightforward. In particular, you will be at ease if you have recently built a PC or a scale model. It took me less than an hour to build mine while I took many pictures to illustrate this post and took my time to avoid rookie mistakes. I made one, though: I kept the display’s protective film on and had to re-open the shell to peel it. The ultrawide 16:6 IPS screen is fantastic (1280 x 480 pixels – 180 x 67 mm). That’s two VGA side-by-side! The only other perplexing moment was when I wanted to screw down the Core; two small protective films got in the way of the screws – that is, if you didn’t brute force yourself through them 😊. Ah, and yes, there is one extra screw (two needed).


The kit ships with a MicroSD card pre-loaded with ClockworkOS. However, it doesn’t come with batteries. These are 18650 batteries you can buy almost everywhere. The DevTerm also has a built-in 2″ thermal printer – I didn’t find any paper roll reference in the manual – so I could not test it yet. Indeed, the paper rolls I bought are just a few millimeters too wide.


The paper input tray can be removed when not in use, which is very convenient. And it certainly has a nostalgia factor to it if you ever used a small pocket computer printer. This printer is not a plotter, like the SHARP CE-150, but rather something close to the Hewlett-Packard HP 82240B.


The keyboard is 65% with directional cursors – like on an NEC PC-8201 –, four buttons a-la game controller, and a small trackball that reminds me of the Blackberry Pearl. If you don’t like them – based on my limited time using them, I am OK with them – you can always use a wireless mouse and/or keyboard. I see the use for such a mouse, but likely not for the extra keyboard. The DevTerm keyboard is superior to pocket computers – I am biased 😊 – but is also inferior to the TRS-80 Model 102 keyboard.


Remember the awful ribbon papery cable Sinclair and other ’80s Britt computer manufacturers used to connect the keyboard to the motherboard? (here or here or here). Luckily, the DevTerm uses pogo pins instead of that plague of the past. Thank you! Several extension ports remain available even if you use a wireless input device. Indeed, the DevTerm has three USB A ports, a charging USB C port, a micro-HDMI port, a 3.5mm headphone port, and a MicroSD slot.


The modular nature of the DevTerm is promising and should allow for future additions & developments. As already mentioned, the Core can be swapped out and upgraded. In particular, the extension board – which surprisingly holds the Core fan – should be an excellent candidate to host a breakout board, allowing for a DIY electronics project. But for now, it would be hard to work the hardware per se, making the DevTerm a software tool. Let’s see what board Clockwork will release in the future. My kit had additional cooling parts (a thermal pad and copper tape), as some users complained about the DevTerm thermals. Since I plan to upgrade the Core, I didn’t install it yet.
In theory, you don’t need any other tool to build a DevTerm besides a quality side cutter. I recommend a set of pliers, a file, and a small screwdriver. The plier helps position the ribbon cables in particular. But, for sure, no soldering is required! The kit is very forgiving, and it is hard to imagine you would face issues.


I read that a few users could not connect to their Wi-Fi network, so I took special care assembling the radio, especially the antenna. Indeed, it is a thin sticker, and it is easy to miss position – or even fold – it. A good pair of pliers and patience are definitively here. Similarly, the two speakers need to stick into place, so take your time: position twice, and stick once.


The resemblance with a scale model reminded me of when I was a kid and built my airplane or ship models. That was a fun one hour; thank you, Clockwork! Since a picture – a stack of them – is worth more than a thousand words, I suppose you’ll appreciate the ones I share here. Enjoy, and maybe see you on Nåttarö’s shores with a DevTerm.
1 thought on “Nåttarö”